Dialogs and Model/View/Controller
Complex GUI programs are organized in terms of a design pattern called model/view/controller or M/V/C. According to this design pattern, the software components are divided into three sets of classes with different responsibilities:
The
model classes are responsible
for managing the program's data. An example of a model class is the Employee class we used in the discussion of text areas.
This class represents the attributes and behavior of emplyee objects, but does
no input or output and does not interact with the users of a program.
The view classes are responsible for
displaying the model to users, and for providing the controls that allow users
to interact with the program. Examples of view classes are GBFrame and IntegerFieldin BreezySwing,
and JButton and JTextArea in javax.swing.
The
controller classes are
responsible for coordinating the interactions among the user, the view, and the
model. For example, when the user clicks a button in a view, a controller
object might respond by taking data from a field in the view, sending it to the
model for processing, and transmitting the result from the model back to
another field in the view. While there are no controller classes available in BreezySwing, you can think of the bottunClicked and menuItemSelected methods as the controllers that you have seen thus
far.
The
M/V/C pattern not only simplifies the design of complex software, but also
allows a program to support multiple views of the same data. For example, the
main window of the text area demo displays an employee's information and allows
the user to compute the total hours and total pay. To allow the user to edit
this information, we might add controls to the same window, but that would
cause incredible clutter. Better to add a single Edit button to the main window,
which pops up another window with the appropriate fields and buttons for
editing. A modified version of this program, showing the main window and the
edit window, appears in the next screen shot:
|
|
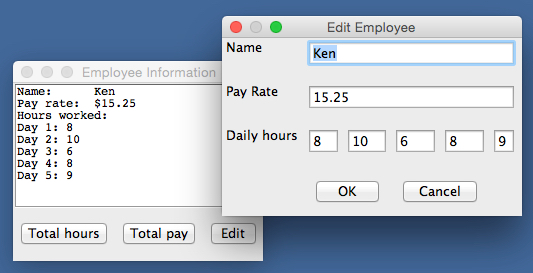
The edit window is a modal dialog, meaning that the window takes control of the application and does not allow the user to return to the main window until she clicks either the OK button or the Cancel button. If the user clicks OK, the edited information is saved to the model (the employee object) and control returns to the main window, whose text area is then updated. If the user clicks Cancel, the dialog closes without any changes to the model or main window.
The code for this program is in the files DialogDemo.java, Employee.java, and EmployeeDialog.java. The first file defines the main window class and the main method. The second file defines the Employee class, as in the earlier example. The third file defines the dialog class, which is a subclass of the GBDialog class in BreezySwing.
Here
is the code for the main window class, which is an extension of the code for
the text area demo's window. Note that a third button has been added, and that
the buttonClicked
method now responds to this third option.
import javax.swing.*;
import BreezySwing.*;
public class DialogDemo
extends GBFrame{
JTextArea
outputArea = addTextArea("", 1,1,3,5);
JButton
totalHoursBtn = addButton
("Total hours", 6,1,1,1);
JButton
totalPayBtn = addButton
("Total pay", 6,2,1,1);
JButton
editBtn = addButton("Edit", 6,3,1,1);
private
Employee emp;
public
DialogDemo(){
int [] hours = {8, 10, 6, 8, 9};
emp = new Employee ("Ken", 15.25, hours);
outputArea.setText (emp.toString());
outputArea.setEditable (false);
}
public
void buttonClicked(JButton buttonObj){
if (buttonObj == totalHoursBtn)
messageBox
("Total hours: " + emp.getTotalHours());
else if (buttonObj == totalPayBtn)
messageBox
("Total pay: $" + emp.computePay());
else{
EmployeeDialog dlg =
new EmployeeDialog(this, emp);
dlg.setVisible
(true);
if (dlg.getDlgCloseIndicator().equals("OK"))
outputArea.setText(emp.toString());
}
}
public
static void main(String[] args){
JFrame frm = new DialogDemo();
frm.setSize(250, 200);
frm.setTitle ("Employee
Information");
frm.setVisible(true);
}
}
When the user clicks the Edit button, the program creates a new instance of the class EmployeeDialog, passes the employee object to this instance, and displays the dialog. Two views, the main window and the dialog, are now sharing the same model. When the user closes the dialog, control returns to the main window's buttonClicked method. If the user has clicked the dialog's OK button, the controller refreshes the main window's text area with the employee's information.
Note that the buttonClicked method passes two arguments, named this and emp, to the constructor that creates the dialog. The name this refers to the main window object, which is considered the parent window of the dialog. The dialog needs to know its parent window, so it can be rendered inactive when the dialog pops up.
To code a dialog, you define a new subclass of the BreezySwing class GBDialog. The process is much the same as defining a new main window class as a subclass of GBFrame. With the exception of drop-down menus, you can add all of the window components to a dialog that you can add to a main window. The controller method buttonClicked is included in the same manner. The dialog class typically includes one or more instance variables to track the data model that it shares with the main window, and the dialog's constructor usually receives this model as an argument. Here is the code for our example dialog class, named EmployeeDialog:
import javax.swing.*;
import BreezySwing.*;
public class EmployeeDialog
extends GBDialog{
// Lay out the GUI
JLabel
nameLbl = addLabel ("Name", 1,1,1,1);
JTextField
nameFld = addTextField ("", 1,2,5,1);
JLabel
payRateLbl = addLabel ("Pay Rate", 2,1,1,1);
DoubleField
payRateFld = addDoubleField (0, 2,2,5,1);
JLabel
daysLbl = addLabel ("Daily hours",3,1,1,1);
IntegerField
day1Fld = addIntegerField (0, 3,2,1,1);
IntegerField
day2Fld = addIntegerField (0, 3,3,1,1);
IntegerField
day3Fld = addIntegerField (0, 3,4,1,1);
IntegerField
day4Fld = addIntegerField (0, 3,5,1,1);
IntegerField
day5Fld = addIntegerField (0, 3,6,1,1);
JButton
okBtn = addButton ("OK", 4,2,2,1);
JButton
cancelBtn = addButton ("Cancel", 4,4,2,1);
// The dialog is passed an
employee object and must refer to it
// at
several locations thereafter.
private
Employee emp;
public
EmployeeDialog(JFrame
parent, Employee emp){
//
The next few lines are part of every dialog
super (parent);
//
** REQUIRED **
setTitle ("Edit
Employee");
setDlgCloseIndicator ("Cancel");
setSize (300, 200);
this.emp = emp;
nameFld.setText (emp.getName());
payRateFld.setNumber (emp.getPayRate());
day1Fld.setNumber (emp.getHours(1));
day2Fld.setNumber (emp.getHours(2));
day3Fld.setNumber (emp.getHours(3));
day4Fld.setNumber (emp.getHours(4));
day5Fld.setNumber (emp.getHours(5));
}
public
void buttonClicked(JButton buttonObj){
//
The choice of buttons is entirely up to the programmer
//
HOWEVER, pull down menus are NOT available.
if (buttonObj == okBtn){
emp.setName (nameFld.getText());
emp.setPayRate (payRateFld.getNumber());
emp.setHours (1,
day1Fld.getNumber());
emp.setHours (2,
day2Fld.getNumber());
emp.setHours (3,
day3Fld.getNumber());
emp.setHours (4, day4Fld.getNumber());
emp.setHours (5,
day5Fld.getNumber());
setDlgCloseIndicator ("OK");
}
dispose();
}
}
Note the call of super(parent) within the dialog's constructor. This call establishes the connection between the dialog and the main window (the dialog's parent) mentioned earlier.
Also note the manipulations of the dialog close indicator in the constructor and the buttonClicked method. This flag is maintained in the GBDialog class, and tracks the way in which the dialog was closed. The two options in this case are "OK" and "Cancel". The latter is the default, so if the OK button is not clicked, that's what the main window will see when control returns to it in its buttonClicked method (see the code for DialogDemo above). But if the user clicked the OK button, the dialog's buttonClicked method must set the flag to "OK" to indicate that changes to the model have occurred.
Finally, note that the dialog's buttonClicked method closes the dialog by calling its dispose method.
| Back to tutorial | Next topic: Scrolling list boxes |