Accessing and Modifying
the Attributes of Window Components
Each window component
contains a dictionary of its attributes.
After a component has been added to the application window, the
programmer can access and modify its attributes by using the subscript with the
name of the attribute (a string), as follows:
widget[attribute name]
widget[attribute name] = value
For example, a label has a
text font and a foreground color that can be modified in this manner. A label also can show either text or an
image, depending on the setting of these attributes. The next program, which displays an
image and a caption, shows how to set the image, font, and color attributes of
labels.
"""File: imagedemo.py."""
from breezypythongui
import EasyFrame
from tkinter
import PhotoImage,
N, S, W, E
from tkinter.font
import Font
class ImageDemo(EasyFrame):
"""Displays
an image and a caption."""
def __init__(self):
"""Sets up the window and
widgets."""
EasyFrame.__init__(self,
title = "Image Demo")
imageLabel = self.addLabel(text
= "",
row = 0, column = 0,
sticky = N+S+W+E)
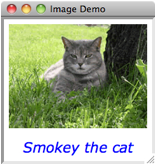
textLabel = self.addLabel(text
= "Smokey the cat",
row = 1, column = 0,
sticky = N+S+W+E)
# Load the image and associate it with the image label.
self.image = PhotoImage(file
= "smokey.gif")
imageLabel["image"] = self.image
# Set the font and color of the caption.
font = Font(family = "Verdana",
size = 20, slant = "italic")
textLabel["font"]
= font
textLabel["foreground"]
= "blue"
#Instantiate and pop up the window.
ImageDemo().mainloop()
Note that this program
must import the PhotoImage and Font
classes and the constants N,
S, W,
and E from the relevant
tkinter modules.
These constants are used to center the two labels in their respective
grid cells, overriding the default placement of a label to the northwest. Here is the window produced by the
program:
|
|