Organizing Widgets with Panels
While a two-dimensional
grid serves well for laying out widgets in most application windows, there are
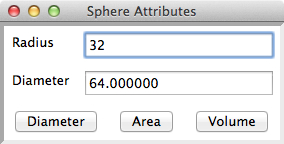
occasions where the widgets just don’t line up properly. For example, consider a window with
pairs of labels and entry fields in the first two rows, and three buttons in
the third row, as shown below (paneldemo1.py).
|
|

Because each widget must
occupy a column in the window’s grid, a third column is necessary for the
rightmost button, thereby causing a ragged appearance in the example window. This problem could be fixed by
stretching either the labels or the fields across two columns in the rows
above, but this may cause alignment issues within those rows.
A better strategy is to
add a single rectangular area called a panel to the third row, stretching it across
all three columns. Each button is
then added to this panel. The
result, shown below, exhibits no distracting extra column or alignment issues (paneldemo2.py).
The code for this program
adds the labels and fields to the window’s grid, as before. However, it now adds a panel to the
third row, before adding the three buttons to the panel. Here is the code for the window setup:
EasyFrame.__init__(self, title = "Sphere
Attributes")
# Label and field for the radius
self.addLabel(text
= "Radius",
row = 0, column = 0)
self.radiusField = self.addFloatField(value = 0.0,
row = 0,
column = 1)
# Label and field for the output
self.outputLabel = self.addLabel(text = "Diameter",
row = 1, column = 0)
self.outputField = self.addFloatField(value = 0.0,
row = 1,
column = 1)
# Panel for the command buttons
buttonPanel = self.addPanel(row = 2, column = 0,
columnspan = 2)
# The command buttons
buttonPanel.addButton(text
= "Diameter",
row = 0, column = 0,
command = self.computeDiameter)
buttonPanel.addButton(text
= "Area",
row = 0, column = 1,
command = self.computeArea)
buttonPanel.addButton(text
= "Volume",
row = 0, column = 2,
command = self.computeVolume)
Note that the panel’s
column span of 2 equals the number of columns in the window’s grid, whereas the
buttons added to the panel are placed in three columns in panel's own grid. Alternatively, we could have created a
panel, stretched across three columns and one row, for the pairs of labels and
fields, and kept the buttons in the window’s grid.
A panel’s background color
can be set when it is created, or modified later. A panel is an instance of the
class EasyPanel, which is a subclass of tkinter.Frame. Thus,
all of the Frame
methods also apply to objects of this type.
The programmer can add any
widget to a panel that can be added to an application window, including other
panels. The following window shows
a set of colored panels, organized in a window’s 4 by 3 grid. The rightmost panel contains two nested
panels (black and gray).
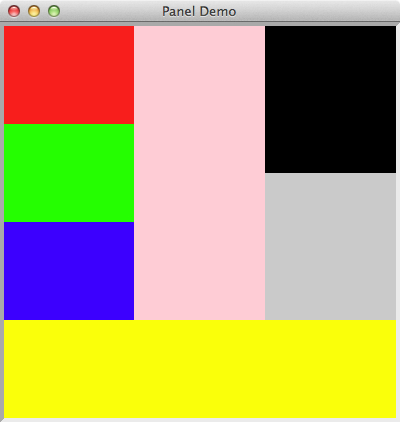
Here is the setup code for
this window (paneldemo0.py):
EasyFrame.__init__(self, title = "Panel
Demo",
width = 400, height = 400)
# Add panels to the main frame (4 rows by 3 columns)
self.addPanel(row
= 0, column = 0, background = "red")
self.addPanel(row
= 1, column = 0, background = "green")
self.addPanel(row
= 2, column = 0, background = "blue")
self.addPanel(row
= 3, column = 0, background = "yellow",
columnspan = 3)
self.addPanel(row
= 0, column = 1, background = "pink",
rowspan = 3)
panel = self.addPanel(row
= 0, column = 2,
rowspan = 3)
# Add nested panels to the rightmost panel
panel.addPanel(row
= 0, column = 0, background = "black")
panel.addPanel(row
= 1, column = 0, background = "gray")